
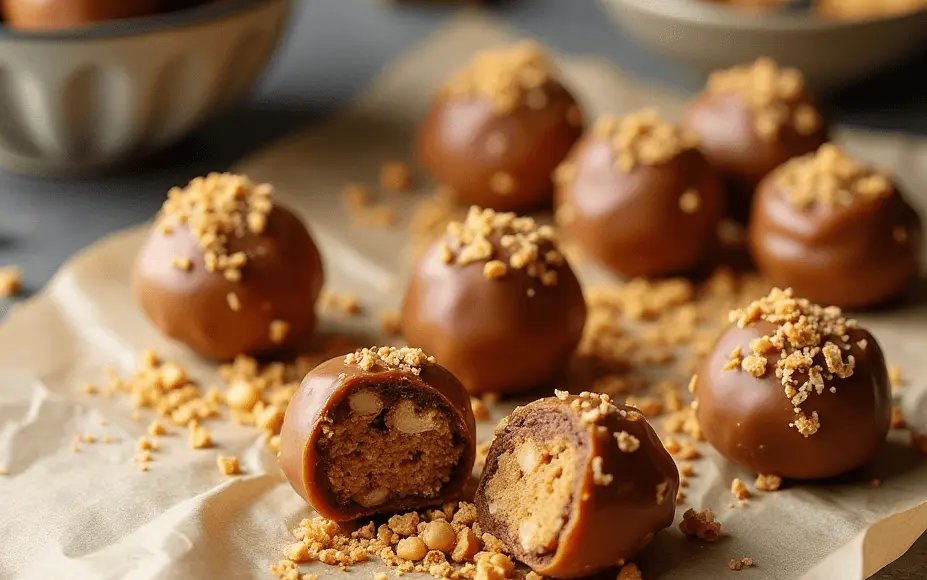
Butterfinger Balls are the ultimate no-bake treat—crunchy, creamy, and irresistibly chocolatey. Have you ever craved a homemade candy that tastes like your favorite childhood indulgence but takes minimal effort? These bite-sized delights combine crushed Butterfinger bars with peanut butter and a smooth chocolate coating, creating a perfect balance of texture and sweetness. Whether you’re making them for holiday platters, party desserts, or just a quick sweet fix, this recipe is as easy as it is addictive. Get ready to whip up a batch of these sinfully good treats with just a few simple ingredients!
Table of Contents
The Story Behind Butterfinger Balls Recipe
There’s something magical about homemade treats that remind us of childhood favorites, and these Butterfinger Balls do just that. Imagine the irresistible crunch of Butterfinger candy bars blended with creamy peanut butter, all wrapped in a rich chocolate coating—pure bliss in every bite!
This recipe was born out of a love for no-bake desserts that are quick, easy, and perfect for any occasion. Whether you’re prepping for a holiday gathering, looking for a fun weekend treat, or making a sweet gift for friends and family, these bite-sized delights always steal the show. Plus, they require minimal effort—no oven, no fuss, just deliciousness!
The best part? You can easily tailor them to your liking! Craving extra crunch? Try mixing in some crushed graham crackers. Prefer a silkier touch? A light drizzle of white chocolate will do the trick. No matter how you customize them, these Butterfinger Balls will be gone in no time!
Key Benefits
Why will you love making these Butterfinger Balls? Besides being absolutely delicious, this recipe offers plenty of reasons to become a go-to favorite in your kitchen.
- Effortless and Fast – No oven required! These delightful treats are ready in minutes, making them ideal for hectic days or spontaneous dessert cravings.
- Minimal Ingredients – With just a handful of pantry staples, you can create a decadent candy-like treat without any complicated steps.
- Perfect for Any Occasion – Whether it’s a holiday gathering, a party dessert, or a simple family snack, these bite-sized delights fit any event.
- Versatile & Personalizable – Craving extra crunch? Mix in graham cracker crumbs. Want a sweeter finish? Drizzle with white chocolate. Adjust the recipe effortlessly to suit your taste!
- Great for Gifting – These Butterfinger Balls store well and look beautiful in decorative boxes or festive bags, making them a thoughtful homemade gift.
With their rich peanut butter flavor, crisp Butterfinger crunch, and smooth chocolate coating, these treats deliver the perfect balance of texture and sweetness—guaranteed to be a crowd-pleaser!
Ingredients You’ll Need
These Butterfinger Balls come together with just a few simple ingredients, creating a delightful balance of crunchy, creamy, and chocolatey goodness. Here’s what you’ll need:
For the Filling:
- 1 ½ cups crushed Butterfinger bars – Adds that signature crisp, peanut-buttery crunch.
- 1 cup creamy peanut butter – Helps bind the ingredients while enhancing the rich, nutty flavor.
- ½ cup unsalted butter (softened) – Creates a smooth, melt-in-your-mouth texture.
- 2 cups powdered sugar – Sweetens the mixture and gives structure to the filling.
- 1 teaspoon vanilla extract – Adds a touch of warmth and depth to the flavor.
For the Coating:
- 2 cups semi-sweet chocolate chips – Melts into a rich, smooth coating that balances the sweetness.
- 1 tablespoon coconut oil (or shortening) – Helps the chocolate melt evenly and creates a glossy finish.
Optional Toppings:
- White chocolate drizzle – For an elegant touch and added sweetness.
- Extra crushed Butterfinger pieces – Sprinkle over the top for extra crunch and visual appeal.
- Sea salt flakes – Enhances the flavor with a hint of contrast.
With these simple ingredients, you’ll create an irresistible treat that’s perfect for any occasion!
How to Make Butterfinger Balls Recipe
Ready to dive in and make these irresistible Butterfinger Balls? The process is simple, and I’ll walk you through each step with some tips along the way to ensure your treats turn out perfectly!
1. Prepare the Butterfinger Filling
- In a large mixing bowl, combine crushed Butterfinger bars, creamy peanut butter, and softened butter. Use a spatula or your hands to mix until everything is well incorporated. You want a smooth, slightly crumbly texture, so don’t be afraid if it’s a little thick.
- Gradually sift in the powdered sugar and mix until the dough becomes firm enough to hold its shape. Add vanilla extract and stir until combined. This creates the perfect filling for your Butterfinger balls.
2. Form the Balls
- Scoop small portions of the mixture and roll them into bite-sized balls, about 1 inch in diameter. If the mixture is too sticky, lightly coat your hands with a bit of butter or oil for easier handling.
- Once you’ve rolled all the balls, place them on a baking sheet lined with parchment paper. Refrigerate for at least 30 minutes to help the filling firm up and hold its shape.
3. Coat with Chocolate
- While the filling is chilling, melt your semi-sweet chocolate chips. You can do this in the microwave in 20-second intervals, stirring in between, or over a double boiler. Add coconut oil or shortening to the chocolate to ensure it melts smoothly and gives a glossy finish.
- Once the chocolate is melted, dip each chilled Butterfinger ball into the chocolate, coating it completely. Allow any excess chocolate to drip off before placing the coated balls back onto the parchment paper.
4. Set and Serve
- For an extra touch, drizzle some white chocolate over the top of each ball and sprinkle with extra crushed Butterfinger or sea salt flakes for added crunch and flavor.
- Let the chocolate coating set for about 30 minutes in the fridge or until firm. Once they’re ready, enjoy these delicious, crunchy, and creamy treats!
By following these steps, you’ll end up with a batch of Butterfinger Balls that are as easy to make as they are to eat—sinfully good, every time!

Pro Tips and Variations
Want to elevate your Butterfinger Balls even more? Here are a few tips and creative variations to make this treat even more special, or to customize it to your exact taste.
Pro Tips:
- Chill the filling – If your mixture feels too soft or sticky to roll, pop it in the fridge for 10-15 minutes before shaping it into balls. This makes the process easier and helps the balls hold their shape.
- Perfect chocolate coating – To achieve a smooth, glossy finish, be sure to fully melt the chocolate without overheating it. If you’re melting in the microwave, stir every 20 seconds to prevent burning.
- Dip with a fork – Use a fork to dip the Butterfinger balls into the melted chocolate, allowing excess chocolate to drip through the tines before setting the balls on parchment paper. This keeps the coating even and prevents messy fingers!
Creative Variations:
- Add a crunch – For an added crunch, try mixing crushed pretzels or crushed graham crackers into the filling. This brings an extra texture that balances the rich chocolate coating.
- Swap the chocolate – Experiment with different types of chocolate. Dark chocolate provides a slightly more bitter contrast, while milk chocolate makes the treats even sweeter. You can also drizzle white chocolate for a beautiful contrast and extra sweetness.
- Stuffed Butterfinger Balls – For a fun twist, try stuffing the balls with chopped nuts, like pecans or almonds, or even small pieces of marshmallows for an extra chewy surprise inside.
- Holiday-themed – Get festive by adding colored sprinkles or edible glitter on top of the chocolate coating for a holiday or special occasion.
- Make them mini – For bite-sized portions, make smaller balls (about ½ inch in diameter). These little treats are perfect for snacking or adding to a dessert platter.
With these tips and variations, you can effortlessly customize your Butterfinger Balls to match any craving or occasion. Let your creativity shine and enjoy experimenting with different flavors and textures!
Serving Suggestions
Now that your Butterfinger Balls are ready, let’s talk about how to serve them! These treats are incredibly versatile and perfect for many occasions, whether you’re hosting a party, looking for a gift idea, or simply satisfying a sweet craving.
For Parties and Gatherings:
- Sweet Snack Platter – Arrange the Butterfinger Balls on a decorative platter alongside other homemade treats, such as brownies, cookies, or truffles. They add a rich, chocolatey touch to any dessert spread.
- Party Favors – Wrap the balls in cellophane bags or decorative paper, tie them with a ribbon, and use them as party favors for birthdays, baby showers, or holidays. They’ll make your guests feel special and appreciated!
- Dessert Bar – Create a DIY dessert bar with these Butterfinger Balls as the star. Include a few different toppings like crushed nuts, sprinkles, or mini marshmallows for guests to customize their treats.
For Gifting:
- Gift in a Jar – Layer the Butterfinger Balls in a mason jar with a ribbon tied around it for a delightful homemade gift. Perfect for holidays or birthdays, this adds a personal touch that anyone will love.
- Chocolate Lovers’ Gift Basket – Pair the Butterfinger Balls with other homemade chocolate treats, like chocolate-dipped strawberries or fudge, to create a decadent chocolate lover’s gift basket.
For Everyday Enjoyment:
- Snack Time – Grab a few Butterfinger Balls when you’re craving something sweet. They’re a perfect, indulgent snack with a cup of coffee, tea, or milk.
- Ice Cream Topping – Chop up the Butterfinger Balls and sprinkle them over vanilla or chocolate ice cream for an easy and delicious dessert.
The beauty of these Butterfinger Balls is that they’re not only a treat but also a versatile addition to your dessert repertoire. Whether you serve them as a simple snack or dress them up for an event, they’re sure to be a crowd-pleaser!
Troubleshooting Common Mistakes
Even the best recipes can have a few bumps along the way! If you’re encountering any issues with your Butterfinger Balls, don’t worry – here are some common mistakes and easy solutions to help you get them just right.
1. The Mixture Is Too Sticky
Sometimes, the Butterfinger mixture can be a bit too sticky to work with. This usually happens if the peanut butter is too runny or the mixture isn’t firm enough.
Solution:
- Chill the mixture – Pop the mixture into the fridge for 10-15 minutes. This will help it firm up and make it easier to roll into balls.
- Add a little more powdered sugar – If it’s still sticky after chilling, try adding a little extra powdered sugar to help absorb the moisture and make it more manageable.
2. Chocolate Coating Is Clumpy or Doesn’t Set Properly
A smooth, glossy chocolate coating is key to making these treats irresistible. If your chocolate coating is clumpy or refuses to set, here’s how to fix it.
Solution:
- Properly melt the chocolate – Be sure to melt your chocolate slowly, either in a double boiler or in short bursts in the microwave. Stir after each interval to prevent overheating, which can cause the chocolate to seize.
- Cool it down – After coating the balls, make sure the chocolate isn’t too hot when you dip. Let it cool slightly for a smoother application.
- Set the balls properly – Allow the coated Butterfinger balls to cool completely in the fridge to ensure the chocolate hardens perfectly.
For additional chocolate-coating inspiration, you might enjoy this sticky chocolate cake recipe, which showcases another delicious way to work with melted chocolate.
3. The Balls Are Too Large or Small
The size of your Butterfinger balls can make a big difference when it comes to texture and bite-sized enjoyment.
Solution:
- Use a cookie scoop – For uniform balls, use a small cookie scoop or spoon. Aim for about 1 inch in diameter for the perfect bite-sized treat.
- Adjust based on preference – If you prefer larger or smaller portions, feel free to adjust, but be mindful that larger balls may require a longer chill time to set properly.
4. The Chocolate Doesn’t Cover the Entire Ball
It can be tricky to coat the balls completely, especially when dipping them by hand.
Solution:
- Use a fork or dipping tool – A fork works perfectly for dipping the balls. Simply lower the ball into the melted chocolate, let excess drip off, and set it on parchment paper. This helps create an even coat without too much mess.
- Double-dip for extra coverage – For a thicker chocolate layer, dip the balls twice. Let the first coat set before re-dipping for a second, more generous layer.
5. They Don’t Hold Their Shape
Sometimes, your Butterfinger balls might flatten or lose their shape before they firm up.
Solution:
- Refrigerate early – If you’ve made a big batch, try chilling them for 10 minutes before rolling to set the mixture slightly. This helps the balls maintain their shape.
- Use a parchment-lined tray – Place your finished balls on a parchment-lined baking sheet to avoid sticking and ensure they maintain their perfect round shape.
By following these simple fixes, your Butterfinger Balls will come out just right every time! If you face any other issues along the way, don’t hesitate to get creative – it’s all part of the fun of baking and making these treats your own!

Chef’s Note
Making Butterfinger Balls at home is a fun and easy way to indulge in a delicious treat that’s perfect for any occasion. While they are simple to prepare, a few special touches can elevate these treats even further.
Texture Tips
One of the key features of a Butterfinger ball is its satisfying crunch paired with the smooth, creamy chocolate coating. If you prefer a bit more crunch, consider adding extra crushed Butterfinger bars or even a handful of chopped peanuts to the mixture. This will add a delightful texture and intensify the flavor.
Flavored Coatings
If you’re a fan of experimenting with different flavors, try coating your Butterfinger balls in something other than milk chocolate. You can dip them in dark chocolate for a richer taste, or even white chocolate for a sweeter contrast. For an extra twist, sprinkle some sea salt on top of the chocolate after dipping—this balance of sweet and salty is irresistible!
Make-Ahead Tip
These Butterfinger Balls store really well, making them a great make-ahead treat for parties or gift giving. Simply place them in an airtight container, and they’ll stay fresh in the fridge for up to a week. If you want to freeze them for longer storage, just layer them in between sheets of parchment paper before freezing. When you’re ready to enjoy them, simply thaw at room temperature for a few minutes.
Customization
Get creative with your Butterfinger Balls! Try mixing in a swirl of peanut butter for extra flavor or drizzling caramel on top for a rich, indulgent touch. The best part? This recipe is incredibly versatile, so have fun and make it your own!
If you love making homemade sweets, you might also enjoy trying this Persimmon Jelly Recipe for a unique and delightful treat.
Enjoy these treats with friends, family, or just as a little indulgence for yourself. Whether you’re serving them for a special occasion or simply enjoying them as an after-dinner snack, these Butterfinger Balls are sure to be a hit every time!
FAQs about Butterfinger Balls Recipe
1. Can I use other types of candy bars instead of Butterfinger?
Yes, absolutely! While Butterfinger provides a unique crunch and flavor, you can swap it out with other candy bars such as Reese’s Peanut Butter Cups, Snickers, or even Twix. Just make sure the candy bars are finely crushed to maintain the texture and ensure an even distribution throughout the mixture.
2. How do I store Butterfinger Balls?
To keep them fresh, store your Butterfinger Balls in an airtight container in the refrigerator. They should last for up to a week. For longer storage, you can freeze them for up to a month—just layer them between parchment paper to prevent sticking.
3. Can I make Butterfinger Balls without chocolate?
While chocolate is what gives Butterfinger Balls their signature richness, you can try using other coatings like white chocolate or even a simple glaze made from powdered sugar and milk for a lighter option. You can also skip the coating entirely and enjoy the mixture as a crunchy candy bite!
4. Can I make these gluten-free?
Yes, this recipe is naturally gluten-free! The ingredients used in the Butterfinger Balls (Butterfinger bars, peanut butter, powdered sugar) are all gluten-free, making them a great treat for those with dietary restrictions. Just be sure that the chocolate you use is gluten-free as well.
5. Can I add peanut butter to the mixture?
Definitely! If you’re a peanut butter lover, you can add a few tablespoons of creamy peanut butter to the mixture for a richer, peanut-filled flavor. This will add some extra smoothness to the texture, balancing the crunch from the Butterfinger bars.
6. Can I make these Butterfinger Balls with kids?
Yes, this is a great recipe to make with children! They can help crush the candy bars, roll the balls, and even dip them into the chocolate. Just make sure to supervise the chocolate melting process, as it can get quite hot.
7. How do I make the chocolate coating smooth?
To achieve a smooth chocolate coating, make sure to melt your chocolate gently using a double boiler or microwave in short intervals, stirring in between. If your chocolate is too thick, you can add a teaspoon of vegetable oil or shortening to thin it out and make it easier to dip.
8. How do I prevent the chocolate from cracking?
If your chocolate coating cracks after dipping, it may be too thick or too cold when applied. Try warming the chocolate slightly if it cools too fast. Additionally, ensure the Butterfinger balls are completely chilled before dipping to prevent the chocolate from hardening too quickly.

Butterfinger Balls Recipe Sinfully Good and Easy
Ingredients
For the Filling:
- 1 ½ cups crushed Butterfinger bars – Adds that signature crisp peanut-buttery crunch.
- 1 cup creamy peanut butter – Helps bind the ingredients while enhancing the rich nutty flavor.
- ½ cup unsalted butter softened – Creates a smooth, melt-in-your-mouth texture.
- 2 cups powdered sugar – Sweetens the mixture and gives structure to the filling.
- 1 teaspoon vanilla extract – Adds a touch of warmth and depth to the flavor.
For the Coating:
- 2 cups semi-sweet chocolate chips – Melts into a rich smooth coating that balances the sweetness.
- 1 tablespoon coconut oil or shortening – Helps the chocolate melt evenly and creates a glossy finish.
Optional Toppings:
- White chocolate drizzle – For an elegant touch and added sweetness.
- Extra crushed Butterfinger pieces – Sprinkle over the top for extra crunch and visual appeal.
- Sea salt flakes – Enhances the flavor with a hint of contrast.
Instructions
Prepare the Butterfinger Filling
- In a large mixing bowl, combine crushed Butterfinger bars, creamy peanut butter, and softened butter. Use a spatula or your hands to mix until everything is well incorporated. You want a smooth, slightly crumbly texture, so don’t be afraid if it’s a little thick.
- Gradually sift in the powdered sugar and mix until the dough becomes firm enough to hold its shape. Add vanilla extract and stir until combined. This creates the perfect filling for your Butterfinger balls.
Form the Balls
- Scoop small portions of the mixture and roll them into bite-sized balls, about 1 inch in diameter. If the mixture is too sticky, lightly coat your hands with a bit of butter or oil for easier handling.
- Once you’ve rolled all the balls, place them on a baking sheet lined with parchment paper. Refrigerate for at least 30 minutes to help the filling firm up and hold its shape.
Coat with Chocolate
- While the filling is chilling, melt your semi-sweet chocolate chips. You can do this in the microwave in 20-second intervals, stirring in between, or over a double boiler. Add coconut oil or shortening to the chocolate to ensure it melts smoothly and gives a glossy finish.
- Once the chocolate is melted, dip each chilled Butterfinger ball into the chocolate, coating it completely. Allow any excess chocolate to drip off before placing the coated balls back onto the parchment paper.
Set and Serve
- For an extra touch, drizzle some white chocolate over the top of each ball and sprinkle with extra crushed Butterfinger or sea salt flakes for added crunch and flavor.
- Let the chocolate coating set for about 30 minutes in the fridge or until firm. Once they’re ready, enjoy these delicious, crunchy, and creamy treats!
Notes
- Calories: 160
- Fat: 10g
- Saturated Fat: 4g
- Trans Fat: 0g
- Cholesterol: 10mg
- Sodium: 40mg
- Carbohydrates: 18g
- Fiber: 1g
- Sugar: 15g
- Protein: 3g