
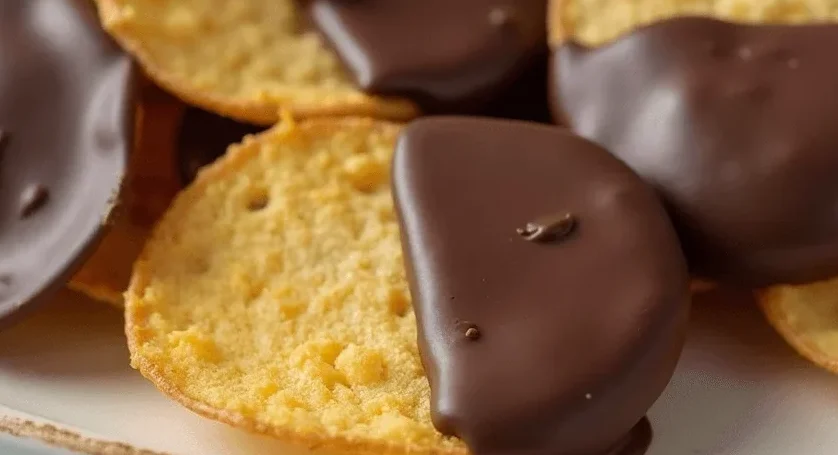
Chocolate covered potato chips are the perfect fusion of sweet and savory, making them a truly irresistible snack. Whether you’re craving something indulgent or looking to surprise your guests with a unique treat, this recipe is sure to hit the spot. The crispy, salty crunch of potato chips combined with smooth, decadent chocolate creates a snack experience like no other. It’s a guilty pleasure that satisfies your sweet tooth while offering that satisfying crunch you crave. What’s better? It’s super easy to make and customizable with your favorite chocolate or toppings! Let’s dive in and make this fun and flavorful snack together.
The Story Behind Chocolate Covered Potato Chips
Chocolate covered potato chips might sound like an unusual combination, but trust me, once you try them, you’ll be hooked! This snack brings together two beloved flavors—salty and sweet—creating a balance that’s both surprising and addictively good. The story behind this snack is rooted in creativity and culinary experimentation, where chefs and home cooks alike decided to push the boundaries of traditional flavors.
Originally, chocolate-covered snacks like pretzels and nuts were the go-to, but someone eventually thought, “What if we combine the crunchy, salty goodness of potato chips with smooth, rich chocolate?” And just like that, an irresistible treat was born. The crispy texture of the chips pairs perfectly with the silky chocolate, delivering a one-two punch of flavor that’s hard to resist.
Chocolate has long been a beloved ingredient in sweet treats, dating back centuries. Its transformation from an elite delicacy to a widely enjoyed indulgence is a fascinating journey. If you’re curious about the rich history of chocolate, check out Chocolate’s Sweet History: From Elite Treat to Food for the Masses.
Over the years, chocolate covered potato chips have become a favorite indulgence, whether for an afternoon treat, a fun party snack, or a simple way to satisfy that sweet-and-salty craving. It’s the perfect snack for people who can’t decide between chocolate or chips—now, they don’t have to! You can also easily customize this recipe by adding different types of chocolate (like dark or white) or even sprinkling on some sea salt for extra flair.
So, whether you’re making them for a party, a gift, or just because you’re craving something special, chocolate covered potato chips offer a fun and indulgent way to enjoy two classic flavors in one bite. Ready to give them a try? Let’s get started!
Key Benefits
Chocolate covered potato chips aren’t just a delicious snack; they also come with a surprising number of benefits that make them even more appealing. Let’s dive into why this treat deserves a spot in your snack rotation:
- Perfectly Balanced Flavors
One of the biggest draws of chocolate covered potato chips is the balance of salty and sweet. The crunchiness of the chips pairs beautifully with the smoothness of the chocolate, creating a snack that satisfies both your savory and sweet cravings in one bite. - Quick and Easy to Make
You don’t need to be a professional chef to whip up this snack! With just a few ingredients—potato chips and your choice of chocolate—you can create a decadent treat in no time. It’s an ideal snack for when you’re short on time but want something special. - Customizable
The best part? You can tailor this recipe to your taste! Whether you love dark chocolate, milk chocolate, or white chocolate, the options are endless. Add a sprinkle of sea salt, crushed nuts, or even caramel drizzle to take your creation to the next level. - Great for Parties and Gifts
Looking for a unique snack to serve at your next gathering? Chocolate covered potato chips are a hit at parties, adding a touch of creativity to your snack table. They also make a fantastic homemade gift—just package them up in a cute jar or bag for a sweet and thoughtful treat. - Satisfies Cravings in One Bite
This snack hits all the right spots. The crispy, salty chips satisfy your craving for something crunchy, while the chocolate satisfies your sweet tooth. It’s the ultimate guilt-free indulgence!
With so many benefits, it’s clear why chocolate covered potato chips are a fan favorite. They’re easy, versatile, and absolutely irresistible—perfect for any occasion! Ready to give them a try? Let’s move on to the next step!
Ingredients You’ll Need
Making chocolate covered potato chips is incredibly simple, and you likely already have most of the ingredients at home. Here’s what you’ll need to get started:
- Potato Chips: Choose high-quality, crispy chips for the best texture. Traditional salted potato chips work great, but feel free to experiment with kettle chips or even sweet potato chips for a twist.
- Chocolate: The star of the show! You can go with milk, dark, or white chocolate depending on your preference. Dark chocolate offers a rich contrast to the saltiness of the chips, while milk chocolate is sweeter and creamier. White chocolate, on the other hand, gives a smoother, sweeter flavor.
- Sea Salt (Optional): A light sprinkle of sea salt on top after coating adds a sophisticated touch and enhances the salty-sweet balance. It’s totally optional, but it’s a small addition that makes a big difference.
- Toppings (Optional): Feel free to get creative! Crushed nuts (like almonds or peanuts), sprinkles, or even a drizzle of caramel can be added for extra flavor and texture.
Pro Tips:
- Quality Matters: For the best chocolate-covered chips, make sure you’re using good-quality chocolate that melts well. Avoid chocolate chips designed for baking, as they often have stabilizers that make them harder to work with.
- Consistency: Aim for a thin, even layer of chocolate over each chip. Too thick and it could overwhelm the delicate chips, too thin and you won’t get that satisfying chocolate crunch in every bite.
With these simple ingredients, you’re all set to make a snack that’s equal parts fun and delicious. Ready to start making your own batch of chocolate covered potato chips? Let’s dive into the next step!

How to Make Chocolate Covered Potato Chips
Now that you’ve got your ingredients ready, it’s time to dive into the fun part—making your chocolate covered potato chips! Follow these simple steps to create a delicious, indulgent treat:
- Melt the Chocolate
Begin by melting your chocolate. You can do this in two ways:- Double Boiler Method: Place your chopped chocolate in a heatproof bowl over a pot of simmering water. Stir occasionally until fully melted and smooth.
- Microwave Method: Place the chocolate in a microwave-safe bowl and heat it in 30-second intervals, stirring in between, until melted.
- Prepare the Chips
Lay your potato chips in a single layer on a baking sheet lined with parchment paper. This will keep the chips from sticking to the surface as the chocolate sets. - Coat the Chips
Using a fork or spoon, dip each chip into the melted chocolate, ensuring it’s coated on one side. Let the excess chocolate drip off, and then place the coated chips back on the baking sheet. You can also use a spoon to drizzle chocolate over the chips for a more controlled coating. - Chill to Set
Once all the chips are coated, transfer the baking sheet to the fridge or freezer. Let the chocolate set for about 15-30 minutes, depending on your desired firmness. If you’re in a hurry, the freezer works a bit faster! - Optional Add-Ins
While the chocolate is still soft, feel free to sprinkle some sea salt or crushed nuts on top for added texture and flavor. You can also drizzle a different type of chocolate over the chips for a marbled effect.
Helpful Hints:
- Avoid Overheating: When melting chocolate, be careful not to overheat it. Chocolate can seize up if it gets too hot, turning grainy and unworkable.
- Thin Coating: Keep the chocolate layer thin but even. You want to taste both the crispiness of the chips and the richness of the chocolate without one overpowering the other.
And just like that, you’ve got yourself a batch of homemade chocolate covered potato chips! Now let them cool and harden, and you’ll have a decadent treat ready to enjoy.
Pro Tips and Variations
To make sure your chocolate covered potato chips turn out perfectly every time, here are some pro tips and variations you can try to take your treat to the next level:
Pro Tips for Perfect Chocolate-Covered Chips
- Choose the Right Chips: Opt for thicker, sturdier potato chips. Thin chips might break when dipping or handling, so look for chips that have a strong crunch without being too delicate.
- Melting Chocolate: When melting chocolate, always stir it gently to ensure it remains smooth. If you prefer, you can add a small amount of coconut oil or vegetable oil to the melted chocolate to make it extra smooth and glossy.
- Room Temperature Chips: Make sure your chips are at room temperature before dipping. Cold chips can cause the chocolate to harden too quickly, resulting in an uneven coating.
- Even Coating: When coating the chips, use a fork to dip and hold them, letting the excess chocolate drip off. This will help prevent the chocolate from pooling around the edges.
Fun Variations to Try
- Nutty Twist: After coating the chips in chocolate, sprinkle them with chopped nuts like almonds, peanuts, or hazelnuts for an added crunch and flavor.
- Marbled Chocolate: For a stunning effect, melt two types of chocolate (e.g., dark and white) and drizzle them over each other. The result is a beautiful marble pattern that adds an elegant touch.
- Spicy Kick: If you love a little heat with your sweetness, sprinkle a pinch of cayenne pepper or chili powder on top of the chocolate-covered chips for a spicy-sweet combo that’s sure to surprise your taste buds.
- Crispy Caramel: Drizzle some caramel sauce over the chocolate-covered chips for an extra layer of sweetness and texture that pairs beautifully with the salty chips.
Storage Tips
Once your chocolate covered potato chips are fully set, store them in an airtight container to keep them fresh. If you live in a warm climate, it’s best to keep them in the fridge to prevent the chocolate from melting. They should stay fresh for up to a week, although I doubt they’ll last that long once you start snacking!
With these pro tips and fun variations, you can make your chocolate covered potato chips truly your own. Whether you prefer a classic version or a bold twist, the possibilities are endless. Happy snacking!
Serving Suggestions for Chocolate Covered Potato Chips
Chocolate covered potato chips are incredibly versatile and can be served in many ways to suit any occasion. Here are a few ideas to help you present this indulgent treat in a way that will impress your guests or satisfy your cravings:
Simple Yet Elegant Presentation
- Snack Bowl: Serve your chocolate-covered chips in a beautiful bowl as a snack at parties or gatherings. The sweet and salty treat will be the star of the snack table.
- Gift Packaging: For a thoughtful homemade gift, package your chocolate-covered chips in a cute jar or decorative box. Tie it with a ribbon for an extra personal touch—it’s perfect for birthdays, holidays, or just because.
- Individual Portions: For a more refined presentation, place individual servings of chocolate-covered chips in small cups or on parchment paper squares. This way, guests can enjoy the treat without the mess.
Pairings to Enhance the Flavor
- Coffee or Tea: Chocolate and coffee or tea are a classic combination. Serve your chips with a cup of freshly brewed coffee or your favorite tea for a sweet, balanced treat.
- Wine Pairing: For an adult twist, pair chocolate-covered chips with a glass of wine. A rich, full-bodied red wine like Cabernet Sauvignon complements the chocolate, while a sparkling wine or Prosecco pairs nicely with the saltiness of the chips.
Creative Ways to Serve
- Ice Cream Topping: Crumble your chocolate-covered chips and sprinkle them over vanilla or chocolate ice cream for a crunchy, indulgent topping.
- In Desserts: Incorporate your chocolate covered potato chips into other desserts like cakes, cupcakes, or brownies. They can add a delightful crunch and a surprising salty-sweet element to any baked good.
- Party Treats: Serve your chocolate-covered chips as part of a dessert spread at parties. You can even create a DIY chocolate chip station where guests can choose from different toppings and chocolate variations.
Looking for more creative snack ideas? Check out this delicious take on a classic school pizza—a nostalgic favorite that’s perfect for gatherings or a fun homemade meal.
Pro Tips:
- Temperature Matters: Serve chocolate covered potato chips at room temperature for the best taste and texture. Cold chips can lose their crispy crunch and become too hard.
- Avoid Over-Serving: While delicious, these chips are rich. Serve them in small portions, so your guests get a perfect bite every time.
With these serving suggestions, you’ll not only enjoy the amazing flavors of chocolate covered potato chips but also create an experience that will leave everyone coming back for more. Whether you’re serving them at a party or enjoying them as a personal treat, this snack is always a winner!
Troubleshooting Common Mistakes
Even the most experienced cooks can face challenges, but don’t worry! Here are some common issues you may encounter when making chocolate covered potato chips and tips on how to fix them:
1. Chocolate Seizing or Becoming Grainy
- What’s Happening: This usually happens if the chocolate is overheated or comes into contact with moisture.
- How to Fix It: When melting chocolate, always use a gentle heat. If using the microwave, heat in short intervals and stir often. If the chocolate starts to seize, you can add a small amount of vegetable oil or coconut oil to restore its smooth texture.
2. Chips Breaking While Dipping
- What’s Happening: Chips might break if they’re too thin or fragile for the chocolate coating.
- How to Fix It: Choose thicker chips for better stability. If your chips are already broken, don’t fret—you can still coat the broken pieces in chocolate and enjoy them as bite-sized treats.
3. Chocolate Layer Too Thick or Thin
- What’s Happening: Sometimes, the chocolate coating can end up too thick, making it too heavy, or too thin, leading to an uneven coat.
- How to Fix It: For a thin but even coating, dip each chip in the chocolate, allowing the excess to drip off. If you want a thicker coat, you can dip the chips again, but make sure to keep it balanced so the chips don’t become overly coated.
4. Chocolate Not Setting Properly
- What’s Happening: If the chocolate isn’t hardening as expected, it could be due to the room temperature or humidity.
- How to Fix It: Ensure your kitchen is cool, and place the chocolate-covered chips in the fridge or freezer to set. If you live in a warmer climate, refrigeration might be necessary to ensure the chocolate hardens properly.
5. Chips Losing Their Crispiness
- What’s Happening: If you store the chips incorrectly, they can lose their crunch and become soggy.
- How to Fix It: Store the chocolate-covered chips in an airtight container at room temperature. If you need to refrigerate them, make sure they are well-covered to avoid moisture buildup that can soften the chips.
6. Excess Chocolate Dripping or Pooling
- What’s Happening: Sometimes chocolate drips off the chips and pools on the parchment paper, causing an uneven presentation.
- How to Fix It: Use a fork to gently tap off excess chocolate after dipping, allowing just enough to coat each chip. This will ensure your chips have an even, smooth layer without too much overflow.
Pro Tips:
- Practice Patience: It might take a little longer for the chocolate to set or harden, especially if it’s a hot day, so give yourself time. Rushing the cooling process could lead to a messy result.
- Try Small Batches: If you’re worried about making too many mistakes, start with a smaller batch to practice before making a larger one.
By following these tips and knowing how to troubleshoot potential issues, you’ll be able to create perfectly chocolate covered potato chips every time! Don’t be discouraged by minor setbacks—just adjust as needed, and enjoy the process of making this sweet and salty treat!
Chef’s Note
Making chocolate covered potato chips is a delightful experience that brings together the perfect balance of salty and sweet. Here are some extra notes and tips from me to ensure that you get the best results every time:
Choosing the Right Chocolate
The choice of chocolate can completely transform the flavor of your potato chips. While creamy milk chocolate is a timeless favorite, experimenting with different varieties can take this treat to the next level. Try dark chocolate for a richer, more intense taste or white chocolate for a smooth, sweet contrast. Feeling adventurous? Combine multiple types of chocolate to create a delicious layered effect that adds both depth and visual appeal!
Using Quality Chips
Not all potato chips are created equal! Go for a brand that has thick, sturdy chips to prevent them from breaking during the dipping process. Wavy chips are often the best choice because their ridges help hold the chocolate, and they offer a satisfying texture contrast. Opt for unsalted chips to keep the salty-sweet balance just right.
Chilling for Perfect Set
After dipping your chips, placing them on a parchment-lined baking sheet is key. Make sure to let them chill properly in the fridge or freezer so the chocolate sets evenly. This step prevents the chocolate from smudging and gives your chips that smooth, glossy finish.
Storage Tips
Chocolate covered potato chips are best enjoyed fresh, but if you have leftovers (which might be rare!), store them in an airtight container at room temperature for up to a week. If you want them to last longer, refrigerate them, but be mindful that the texture may change slightly.
Customization Ideas
Feel free to get creative! You can drizzle melted caramel or peanut butter over the chocolate-covered chips for extra sweetness. Add crushed nuts, sprinkles, or even sea salt for a gourmet touch. There are countless ways to get creative, so feel free to experiment and make it your own!
Pro Tip:
To make the chocolate melt more smoothly, consider using a double boiler or microwave in short intervals. Stir gently to avoid overheating the chocolate, which can lead to a grainy texture.
With these tips in mind, I’m confident your chocolate covered potato chips will turn out beautifully every time. Remember, it’s all about enjoying the process and making it your own. Happy snacking!
Chocolate Covered Potato Chips FAQs
When making chocolate covered potato chips, it’s natural to have questions along the way. To help you out, here are answers to some of the most frequently asked questions about this sweet and salty treat:
1. Can I use any type of chocolate?
Yes, absolutely! While milk chocolate is the classic choice, feel free to explore dark chocolate for a rich, slightly bitter flavor or white chocolate for a sweeter treat. You can also combine different types of chocolate to create a unique flavor profile. The key is to use chocolate that melts smoothly.
2. How do I prevent the chocolate from melting too quickly while dipping?
To prevent the chocolate from melting too fast, work in small batches. If you’re melting the chocolate on the stovetop, use a double boiler to keep it at a controlled temperature. If using the microwave, heat it in short bursts and stir in between to ensure it melts evenly.
3. Can I use homemade potato chips?
Yes! If you’re up for it, homemade potato chips can add an extra level of flavor and crunch to your chocolate-covered chips. Just make sure they’re fully cooled and crispy before dipping them into the chocolate to ensure the best results.
4. How long should I let the chocolate-covered chips cool before serving?
After dipping the chips, it’s best to let them chill in the fridge or freezer for about 15-20 minutes to allow the chocolate to set properly. You’ll know they’re ready when the chocolate is firm to the touch and no longer soft.
5. Can I add toppings to my chocolate-covered chips?
Yes! This is one of the fun parts of making chocolate covered potato chips—you can customize them however you like. Add a sprinkle of sea salt, crushed nuts, sprinkles, or even drizzle some caramel or peanut butter over the chocolate for extra flavor.
6. How should I store the chocolate covered potato chips?
Store your chocolate-covered chips in an airtight container at room temperature for up to a week. If you need to store them for longer, you can refrigerate them, but be aware that the texture may change slightly. Always make sure the chips are completely cool before storing to avoid condensation.
7. Why did my chocolate become grainy or lumpy?
Chocolate can become grainy if it’s overheated or comes into contact with moisture. If this happens, you can save the chocolate by adding a small amount of vegetable oil or coconut oil to restore its smoothness. Always melt chocolate gently to avoid this issue.
8. Can I use non-dairy chocolate for a vegan option?
Absolutely! There are many great dairy-free chocolate options available that are perfect for making vegan chocolate covered potato chips. Look for chocolate that’s labeled as dairy-free or vegan to keep the recipe fully plant-based.
9. How do I make the chocolate layer thicker or thinner?
If you want a thicker chocolate coating, simply dip the chips twice, allowing the first layer to set before applying a second. For a thinner layer, tap off the excess chocolate with a fork to ensure just a light coating.
With these answers in mind, you’re ready to make the best chocolate covered potato chips ever! Don’t hesitate to get creative and enjoy the process—this treat is all about fun and flavor!
Chocolate Covered Potato Chips: A Decadent Snack You’ll Love
Ingredients
- Potato Chips: Choose high-quality crispy chips for the best texture. Traditional salted potato chips work great, but feel free to experiment with kettle chips or even sweet potato chips for a twist.
- Chocolate: The star of the show! You can go with milk dark, or white chocolate depending on your preference. Dark chocolate offers a rich contrast to the saltiness of the chips, while milk chocolate is sweeter and creamier. White chocolate, on the other hand, gives a smoother, sweeter flavor.
- Sea Salt Optional: A light sprinkle of sea salt on top after coating adds a sophisticated touch and enhances the salty-sweet balance. It’s totally optional, but it’s a small addition that makes a big difference.
- Toppings Optional: Feel free to get creative! Crushed nuts (like almonds or peanuts), sprinkles, or even a drizzle of caramel can be added for extra flavor and texture.
Instructions
Melt the Chocolate
- Begin by melting your chocolate. You can do this in two ways:
- Double Boiler Method: Place your chopped chocolate in a heatproof bowl over a pot of simmering water. Stir occasionally until fully melted and smooth.
- Microwave Method: Place the chocolate in a microwave-safe bowl and heat it in 30-second intervals, stirring in between, until melted.
Prepare the Chips
- Lay your potato chips in a single layer on a baking sheet lined with parchment paper. This will keep the chips from sticking to the surface as the chocolate sets.
Coat the Chips
- Using a fork or spoon, dip each chip into the melted chocolate, ensuring it’s coated on one side. Let the excess chocolate drip off, and then place the coated chips back on the baking sheet. You can also use a spoon to drizzle chocolate over the chips for a more controlled coating.
Chill to Set
- Once all the chips are coated, transfer the baking sheet to the fridge or freezer. Let the chocolate set for about 15-30 minutes, depending on your desired firmness. If you’re in a hurry, the freezer works a bit faster!
Optional Add-Ins
- While the chocolate is still soft, feel free to sprinkle some sea salt or crushed nuts on top for added texture and flavor. You can also drizzle a different type of chocolate over the chips for a marbled effect.
Notes
- Calories: 200 kcal
- Fat: 12g
- Saturated Fat: 7g
- Trans Fat: 0g
- Cholesterol: 10mg
- Sodium: 120mg
- Carbohydrates: 25g
- Fiber: 2g
- Sugar: 20g
- Protein: 2g
- Vitamin A: 2%
- Vitamin C: 4%
- Calcium: 2%
- Iron: 4%