
Who can resist the irresistible crunch of crispy chicken tenders and golden fries? Whether you’re craving a kid-friendly meal or a satisfying comfort food classic, this recipe delivers the perfect balance of juicy chicken and crispy texture. With a simple buttermilk marinade and a flavorful homemade seasoning, every bite is packed with flavor.
The best part? You can fry, bake, or air-fry these tenders to suit your preference. Pair them with seasoned fries and your favorite dipping sauces like ranch or honey mustard for a meal the whole family will love. Ready to make restaurant-quality tenders at home? Let’s get started!
Table of Contents
The Story Behind Chicken Tenders and Fries
Chicken tenders and fries—a simple yet beloved combination that has become a staple of comfort food around the world. The roots of this dish are found in the universal appeal of crispy, golden-brown fried chicken paired with the satisfying crunch of fries. But what makes this dish so iconic?
It all began with the desire to create a meal that was both convenient and delicious. Chicken tenders, often made from the tenderloin of the chicken breast, were initially designed as an easy-to-eat, hand-held option for busy families and restaurants. The bite-sized pieces of chicken were seasoned and fried to perfection, offering the perfect balance of crispy exterior and juicy interior.
Fries, or French fries as they’re often called, trace their history back to Belgium or France, with both countries claiming to be the birthplace of this popular snack. Originally sliced thin and fried in oil, fries quickly became a hit, often served alongside sandwiches, burgers, or even as a stand-alone snack.
When these two dishes were paired together, they created an irresistible duo that appealed to people of all ages. Whether enjoyed as a quick weeknight dinner or served at family gatherings, chicken tenders and fries are a nostalgic comfort food that’s both easy to make and universally loved.
From fast food joints to home kitchens, this combo has stood the test of time, constantly evolving with new seasoning variations, dipping sauces, and preparation methods. Today, chicken tenders and fries remain a go-to choice for satisfying cravings, offering a tasty balance of savory, crispy goodness.
Key Benefits
Why do we all love crispy chicken tenders and fries so much? It’s not just the delicious crunch and juicy bite—this meal brings a lot more to the table. Here are some of the key benefits that make this dish a go-to favorite:
- Quick and Easy: Whether you’re making it for a weeknight dinner or a last-minute snack, this recipe comes together in no time. With simple ingredients like chicken breast, potatoes, and seasonings, you can whip up a satisfying meal in under 30 minutes.
- Customizable to Your Taste: The beauty of this dish is that it can be tailored to your preference. Want a spicier kick? Add a pinch of cayenne or chili powder. Prefer a milder flavor? Stick with garlic powder and paprika. You’re in control of the seasoning, making it the perfect meal for every palate.
- Multiple Cooking Methods: Whether you’re using a deep fryer, air fryer, or simply baking the tenders in the oven, this recipe works for any method you prefer. Each option delivers a crispy texture without sacrificing the tenderness of the chicken.
- Family-Friendly: This meal is a hit with all ages! Kids love the crispy coating, while adults appreciate the homemade, healthier spin on takeout. Serve it with a side of seasoned fries, and you’ve got a full meal that everyone can enjoy.
- Perfect for Meal Prep: Making extra? These tenders reheat beautifully, so you can enjoy leftovers the next day. Whether in a lunchbox or as an afternoon snack, this dish stays delicious even after being stored in the fridge.
Additionally, chicken itself offers significant health benefits, making it a nutritious choice for your meals. For more on the health benefits of chicken, check out this WebMD article.
There’s a lot to love about these crispy chicken tenders and fries, from the flavor-packed coating to the ease of preparation. It’s a versatile meal that can be enjoyed in so many ways!
Ingredients You’ll Need
To make these crispy chicken tenders and fries, you won’t need any fancy ingredients—just a few simple staples you probably already have in your pantry and fridge. Here’s what you’ll need to get started:
For the Chicken Tenders
- The chicken breasts (boneless and skinless, sliced into strips) are the main component of the dish! If you prefer a more succulent cut, chicken thighs can also be used as an alternative.
- Buttermilk – Adds flavor and helps tenderize the chicken. If you don’t have buttermilk, you can make your own by mixing milk with a splash of vinegar.
- Panko breadcrumbs – These give the tenders their crispy texture. You can swap with regular breadcrumbs if needed, but panko offers a crunchier result.
- All-purpose flour – Helps the seasoning stick to the chicken and contributes to the crispy coating.
- Eggs – These act as a binder to hold the breadcrumbs and flour together on the chicken.
- Seasoning – A simple mix of paprika, garlic powder, onion powder, salt, and pepper. Feel free to add your own favorite spices!
For the Fries
- Potatoes (Russet or Yukon gold are great choices) – Cut into thin strips for crispy fries. You can even make sweet potato fries for a fun twist!
- Vegetable oil – For frying or coating if baking. If you’re using an air fryer, you’ll only need a light spritz of oil.
- Seasoning – Salt, pepper, and a sprinkle of paprika or garlic powder are perfect for seasoning your fries.
Optional Dipping Sauces
- Ranch dressing – A classic pairing for chicken tenders.
- Honey mustard – Sweet and tangy, it complements the crispy chicken perfectly.
- Ketchup – For the fries, of course!
With these simple ingredients, you’re just a few steps away from making a mouthwatering, crispy meal that’ll become a favorite in your home. Let’s get cooking!

How to Make Chicken Tenders and Fries
Now that you have everything you need, let’s dive into making these crispy chicken tenders and fries. Whether you’re using the deep fryer, air fryer, or baking them in the oven, you’ll be amazed at how simple it is to prepare this delicious dish.
Step 1: Prep the Chicken
- Cut the chicken into strips, making sure they’re evenly sized for consistent cooking.
- Marinate the chicken: In a bowl, mix the buttermilk with a pinch of salt, pepper, and a dash of garlic powder. Add the chicken and let it sit for at least 30 minutes (or even overnight) to soak in all the flavor. If you’re short on time, a quick 15-minute soak will still do wonders!
Step 2: Coat the Chicken
- In one bowl, add flour and season it with paprika, garlic powder, onion powder, salt, and pepper.
- In another bowl, whisk the eggs to create an egg wash.
- In a third bowl, pour your panko breadcrumbs.
- Dredge the marinated chicken: First, dip each strip into the flour mixture, then the egg wash, and finally coat it well with the panko breadcrumbs. This double-dipping process ensures a perfectly crispy, crunchy exterior.
Step 3: Cook the Chicken
- For deep frying, heat the oil to 350°F (175°C). Fry the chicken strips in small batches for 3-4 minutes, or until they turn golden brown and crispy. Once done, use a slotted spoon to place the chicken on a plate lined with paper towels to absorb any excess oil.
- Air frying: Preheat your air fryer to 400°F (200°C). Lightly spray the chicken strips with oil and cook for about 10-12 minutes, flipping halfway through. The result will be just as crispy with much less oil!
- Baking: Preheat your oven to 425°F (220°C). Place the coated chicken strips on a baking sheet lined with parchment paper or a silicone baking mat. Bake for about 15-20 minutes, flipping halfway through to ensure even crispiness.
Step 4: Prepare the Fries
- While the chicken is cooking, cut the potatoes into fries. If you want extra-crispy fries, soak the cut potatoes in water for about 30 minutes before cooking to remove excess starch.
- Fry, bake, or air fry the fries:
- Deep fry in hot oil for about 4-5 minutes or until golden and crispy.
- Air fry by spraying the fries with a bit of oil and cooking at 400°F (200°C) for about 15-20 minutes, shaking halfway through.
- Bake by spreading the fries in a single layer on a baking sheet and baking at 425°F (220°C) for 25-30 minutes, flipping halfway.
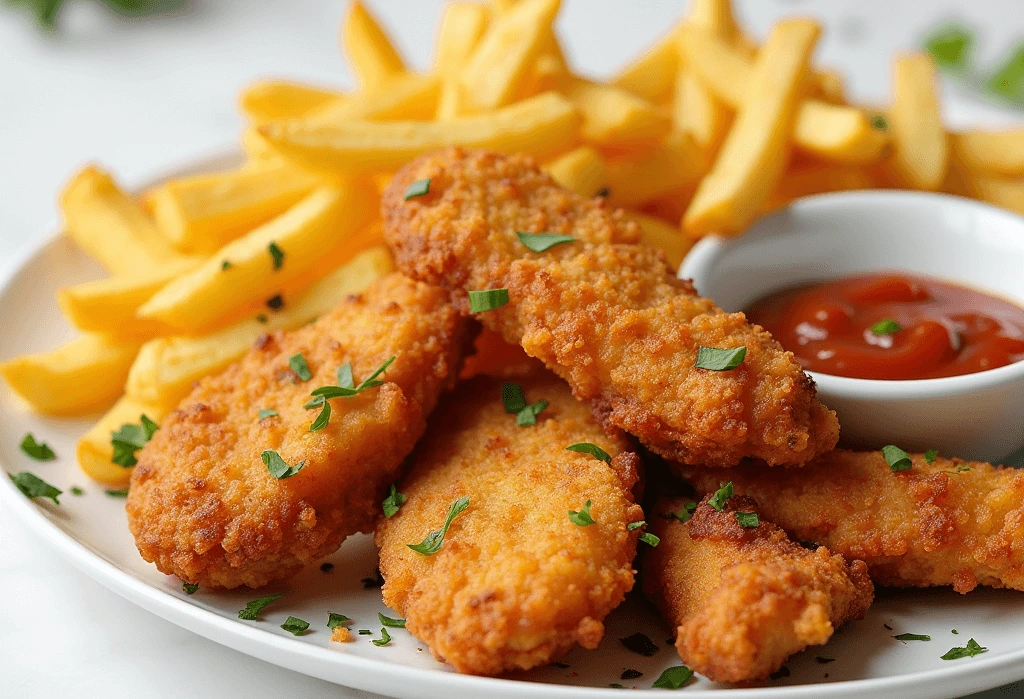
Step 5: Serve & Enjoy
Once the chicken tenders and fries are cooked, it’s time to serve! Place the crispy chicken strips alongside your perfectly seasoned fries. Serve with dipping sauces like ranch, honey mustard, or ketchup, and enjoy this comfort food classic!
With a few simple steps, you’ve created a meal that’s crispy, golden, and absolutely delicious. Ready to dig in?

Pro Tips and Variations
To elevate your chicken tenders and fries experience, here are a few pro tips and variations to try. These little adjustments can add new flavors or make the process even easier—because who doesn’t love a bit of kitchen creativity?
Pro Tips for Extra Crispy Chicken Tenders
- Double coat the chicken: For an even crispier result, try double-coating the chicken. After the first dip in flour, egg, and breadcrumbs, repeat the process. This extra layer adds more crunch and a thicker crust.
- Use cornstarch: Mix in a tablespoon of cornstarch with the flour for a lighter, crunchier coating. It will create a crisp exterior that stays crispy even after resting.
- Don’t overcrowd the fryer: Whether you’re deep frying or air frying, make sure the chicken has plenty of space to cook. Overcrowding the pan or basket can lead to soggy spots.
Flavor Variations for Chicken Tenders
- Spicy kick: For a bit of heat, add cayenne pepper, chili powder, or hot sauce to the buttermilk marinade. This will infuse the chicken with bold, spicy flavors.
- Herb-infused: Add fresh herbs like oregano, thyme, or parsley to the panko breadcrumbs for a fresh, aromatic flavor.
- Parmesan-crusted: Mix some grated Parmesan cheese into the breadcrumbs for a cheesy twist. It adds a deliciously savory crunch to each bite.
Fries Variations to Try
- Sweet potato fries: Swap regular potatoes with sweet potatoes for a healthier and naturally sweeter alternative. They cook similarly and pair perfectly with chicken tenders.
- Seasoning options: Try experimenting with seasonings like garlic powder, onion powder, paprika, or even a sprinkle of truffle salt for an elevated, gourmet twist.
- Loaded fries: Turn your fries into a meal by topping them with melted cheese, crispy bacon, and a drizzle of ranch dressing. It’s a fun variation if you’re craving something indulgent!
Making It Gluten-Free
- To make this dish gluten-free, simply swap the panko breadcrumbs and flour for gluten-free alternatives. There are many options on the market, and you can easily find gluten-free breadcrumbs or make your own by crushing gluten-free crackers.
Air Fryer Tips for Faster Cooking
- If you’re using an air fryer, preheat it to 400°F (200°C) to ensure a crisp, golden exterior. Be sure to lightly spray the chicken and fries with oil to help them crisp up without deep frying.
- Halfway through cooking, shake the basket to ensure the chicken cooks evenly and achieves a uniform crispiness.
These simple tips and variations will not only enhance your chicken tenders and fries but also give you endless options for flavor combinations and textures. So, whether you’re looking to add a little spice, make them gluten-free, or switch things up with different seasonings, these ideas will keep your cooking exciting every time you make this dish!
Serving Suggestions
Now that your chicken tenders and fries are cooked to perfection, let’s talk about how to serve them for the best experience. The right sides, dips, and presentation can take this dish from great to truly amazing!
Classic Dips
- Honey mustard: The perfect blend of sweet and tangy, honey mustard complements crispy chicken tenders wonderfully. It’s a timeless combination that always hits the mark!
- Ranch dressing: For a rich and creamy dip, ranch is always a favorite. The cool, creamy texture complements the crunch of the tenders perfectly.
- Barbecue sauce: Smoky, tangy barbecue sauce gives a nice depth of flavor to the chicken. It’s especially great if you’ve added some extra spice to your tenders.
- Ketchup or aioli: If you’re in the mood for a simple but satisfying dip, ketchup works wonders. Or, for a more gourmet twist, try garlic aioli for a creamy, savory dip.
Fresh Sides
- Coleslaw: A refreshing, crunchy coleslaw can add a cool contrast to the hot, crispy chicken and fries. Plus, the tangy dressing adds a nice zing!
- Crisp salad: A simple mixed green salad with cucumbers, tomatoes, and a light vinaigrette balances the richness of the fried chicken.
- Grilled vegetables: For a healthier touch, try serving grilled veggies like zucchini, bell peppers, or asparagus on the side. Their charred flavor complements the dish beautifully.
Fries Enhancements
- Cheese: Melted cheddar or a sprinkle of Parmesan cheese can take your fries to the next level. For loaded fries, top them with cheese, bacon bits, and a drizzle of sour cream.
- Seasoned fries: Try tossing your fries in garlic powder, smoked paprika, or even a dash of cayenne pepper for extra flavor. You can mix and match your favorite seasonings to make the fries unique to your taste.
Drinks to Pair With
- Iced tea: A glass of refreshing iced tea (sweetened or unsweetened) is the perfect drink to complement your meal, adding a light and refreshing note to balance out the richness.
- Lemonade: If you prefer something tangier, freshly squeezed lemonade pairs wonderfully with the savory chicken tenders and fries, offering a nice contrast.
Plating Tips
When serving your chicken tenders and fries, presentation is key! A simple but elegant way to plate the dish is to arrange the chicken tenders in a row with the fries on the side. Garnish with a sprinkle of parsley or cilantro for a fresh pop of color. You can also use parchment paper or a rustic plate for that classic diner vibe.
For another tasty and satisfying dish, consider trying a Tortilla Quiche Bake as a side or a standalone meal for a delightful twist.
These serving suggestions offer endless possibilities to customize your meal, making it more fun, flavorful, and fitting for any occasion. Whether you’re serving it up as a quick weeknight dinner or as a fun meal for guests, these ideas will make your chicken tenders and fries shine!
Troubleshooting Common Mistakes
Even though chicken tenders and fries is a straightforward recipe, there are a few common mistakes that can happen along the way. Don’t worry—I’ll help you avoid them so you can enjoy crispy, juicy tenders and golden fries every time!
1. Chicken Tenders Turning Out Dry
If your chicken tenders are dry, it might be because they were overcooked. Here’s how to avoid it:
- Cook at the right temperature: Make sure your oil is hot enough (around 350°F or 175°C) before adding the tenders. This ensures they cook quickly, keeping the inside juicy and the outside crispy.
- Use a thermometer: If you’re baking instead of frying, use a meat thermometer to check the internal temperature. It should reach 165°F (75°C). Anything higher, and the tenders may dry out.
- Don’t overcrowd the pan: If you’re frying, give the tenders room to breathe! Crowding the pan can lower the oil temperature, resulting in soggy chicken.
2. Fries Becoming Soggy
Soggy fries are a common problem, but don’t worry—there are solutions to keep your fries crispy:
- Dry the potatoes: After you’ve cut your fries, make sure to dry them well with a towel before cooking. Excess moisture leads to soggy fries.
- Use enough oil: Whether you’re frying or baking, ensure the fries are fully coated in oil. This helps them crisp up nicely without absorbing too much oil.
- Double fry method: If you’re frying, try the double fry method. First, cook the fries at a lower temperature (around 300°F or 150°C) to soften them. Then, increase the temperature to 375°F (190°C) to crisp them up perfectly.
3. Breading Falling Off the Chicken
Nobody likes when the crispy breading falls off during cooking. Here’s how to prevent it:
- Press the breading into the chicken: After dipping the chicken in the egg wash and breading, press down gently to make sure it sticks.
- Let it rest: Let the breaded chicken tenders rest for a few minutes before frying or baking. This helps the breading adhere better during cooking.
- Use a wire rack: If you’re baking your tenders, place them on a wire rack to allow air to circulate around them. This helps keep the breading intact and ensures even cooking.
4. Overcooking the Fries in the Oven
If you’re baking the fries, they can sometimes burn before they’re fully cooked. Here’s how to prevent this:
- Flip halfway through: Toss the fries about halfway through the baking process. This ensures they cook evenly on all sides and helps prevent burning.
- Check your oven temperature: Make sure the oven is preheated properly and set at 425°F (220°C). If the temperature is too high, the fries can burn quickly without cooking through.
5. Not Enough Flavor
If your chicken tenders and fries are lacking in flavor, it could be due to insufficient seasoning. Here’s how to fix it:
- Season generously: Don’t be afraid to season your chicken tenders and fries with salt, pepper, and other spices like garlic powder, onion powder, or paprika. Be sure to season both the breading and the chicken itself.
- Marinate the chicken: For an extra burst of flavor, marinate your chicken tenders for at least 30 minutes before cooking. A simple marinade made with olive oil, lemon juice, garlic, and herbs will enhance the taste.
6. Uneven Cooking
If your chicken tenders or fries cook unevenly, try these tips:
- Even slices: When cutting your fries, aim for uniform thickness so they cook at the same rate. The same goes for the chicken tenders—try to cut them into equal pieces.
- Rotate the food: Whether you’re frying or baking, rotate your tenders and fries regularly to ensure even cooking on all sides.
With these tips, you’ll avoid common pitfalls and be on your way to serving up perfect chicken tenders and fries every time. Happy cooking!
Chef’s Note
As you embark on making these chicken tenders and fries, it’s important to keep a few things in mind to ensure everything turns out just right. While this dish is simple, the key to making it truly delicious lies in the little details. Here are some extra tips that I swear by when preparing this meal.
1. Fresh Ingredients Make a Difference
The fresher the ingredients, the better your chicken tenders will taste. If possible, go for fresh chicken breasts and cut them yourself. This not only ensures the meat stays tender, but it also allows you to cut the tenders to the perfect size for frying or baking.
2. Experiment with Seasonings
Feel free to get creative with the seasoning! While a classic seasoned breading of garlic powder, paprika, and salt is fantastic, you can also try adding Cajun seasoning, Italian herbs, or even a dash of chili powder for an added kick. The beauty of this recipe is that it can easily be customized to suit your flavor preferences.
3. Keep the Oil at the Right Temperature
When frying chicken tenders, it’s essential to maintain the right oil temperature. If it’s too hot, the exterior will burn before the inside cooks properly. If it’s too cold, the tenders will absorb excess oil and become greasy. For the crispiest results, aim for a temperature of 350°F (175°C).
4. Use a Wire Rack for Crispy Fries
For crispy fries straight from the oven, use a wire rack to cook them. This allows the heat to circulate around the fries, making them crispier on all sides. If you don’t have a wire rack, a baking sheet lined with parchment paper works just as well—just make sure to flip the fries halfway through cooking.
5. Pair It with a Dipping Sauce
What’s a great chicken tender without a delicious dipping sauce? I highly recommend trying honey mustard, BBQ sauce, or even a creamy ranch dressing for extra flavor. A great dip can take your meal to the next level!
6. Meal Prep and Leftovers
This recipe is fantastic for meal prep. You can easily double the batch of chicken tenders and fries, storing leftovers in an airtight container for a few days. When reheating, pop them back into the oven to get the tenders crispy again, and enjoy a quick, delicious meal!
Cooking chicken tenders and fries is all about creating that perfect balance between crispy, tender, and flavorful. By keeping these tips in mind, you’ll elevate this classic comfort food to a whole new level. Enjoy!
FAQs About Chicken Tenders and Fries
Can I bake instead of fry the chicken tenders?
Definitely! Baking chicken tenders offers a healthier option compared to frying. Simply arrange the breaded tenders on a wire rack set over a baking sheet to allow air circulation and ensure an even crisp. Bake at 400°F (200°C) for about 15-20 minutes, or until the tenders are golden and fully cooked, turning halfway through.
What can I serve with chicken tenders and fries?
This dish is incredibly versatile and complements a wide range of sides perfectly. Coleslaw, mac and cheese, or a simple green salad can balance the meal with some freshness and crunch. If you’re craving more carbs, try adding garlic bread or corn on the cob for a filling meal. Don’t forget your favorite dipping sauces, like honey mustard or BBQ sauce, to complete the experience.
How do I keep my fries crispy after cooking?
To keep your fries crispy, drain them well on paper towels right after cooking. If you’re serving them right away, place them on a wire rack, which allows air to circulate around the fries, preventing them from becoming soggy. For the crispiest fries, reheat them in a hot oven or air fryer for a couple of minutes before serving.
Can I use sweet potatoes for the fries?
Absolutely! Sweet potato fries are a fantastic twist on this classic dish. Simply follow the same instructions, but keep in mind that sweet potatoes may cook a bit faster than regular potatoes. You may also want to reduce the cooking time slightly for a crispier texture, or bake at a lower temperature to avoid burning.
How do I know when the chicken tenders are done?
The best way to check if your chicken tenders are done is by using a meat thermometer. Insert it into the thickest part of the tender, and once it reads 165°F (74°C), your chicken is fully cooked. If you don’t have a thermometer, simply cut into the center of the tender—if the juices run clear and the meat is no longer pink, it’s ready to go!
Can I make this recipe gluten-free?
Yes, you can easily adapt this recipe to be gluten-free by swapping out regular breadcrumbs for a gluten-free version. You can find many gluten-free breadcrumbs in stores, or you can make your own by grinding gluten-free crackers or oats. Just make sure your seasoning is also gluten-free, and you’re good to go!
Can I use frozen chicken tenders?
Frozen chicken tenders can be a quick and convenient option, but I recommend making fresh ones when you have the time for the best flavor and texture. If you do choose frozen tenders, follow the instructions on the package for cooking, but be sure to bake them at a high temperature to get them nice and crispy.
These FAQs should help clear up any questions and give you more confidence in making this recipe your own. Remember, the key to perfecting chicken tenders and fries is to experiment and have fun with it!